Introduction: The High-Stakes Art of Preparing Vector Artwork for Metal Products
Producing exceptional metal products begins long before casting or stamping. It all starts with vector artwork—precise, well-crafted design files that translate creative ideas into flawless, manufacturable reality. If you’re getting ready to submit designs for enamel pins, commemorative medals, high-end packaging parts, or any custom metal craft, understanding how to prepare vector artwork for production is non-negotiable. In this comprehensive guide, we’ll uncover industry-vetted steps and insider tips that protect both your concept and your bottom line, ensuring your designs move smoothly from computer screen to beautiful, finished metal.
Why Only Vector Artwork Works for Metal Production

Metal manufacturing relies on digital instructions to create precision molds, perform laser cutting, or guide stamping dies. Raster images like JPEG or PNG simply don’t cut it because they become blurry, jagged, or unpredictable when scaled. Vector artwork—created with software such as Adobe Illustrator (AI), CorelDRAW, or saved as SVG, EPS, or PDF—uses mathematical paths. This keeps every detail crisp at any size, no matter how small your text or intricate your emblem. The result? Clean lines, sharp logos, and consistent details on your finished metal products, from medals to badges and hardware components.
Selecting the Right Vector File Format
One of the critical decisions is choosing a file format your manufacturer can actually use. For most modern factories, AI (Adobe Illustrator), SVG, and EPS are the safest bets, balancing broad compatibility and editability. PDF is increasingly accepted for simple, single-layer designs, but always check with your manufacturer’s prepress guidelines. Avoid flattening layers or converting to raster during export—vector purity is essential for clean conversion to metal cutting or molding software. For more on why proper file formats matter from mold to finish, see How Molds Are Made: CNC vs. Hand Carving.
Color Modes and Why Pantone Matters in Metal Products
Your choice of color isn’t just an aesthetic preference—it directly impacts paint matching, plating, and even cost. For metal crafts, always use solid Pantone Matching System (PMS) colors when possible, rather than RGB or CMYK blends. Pantone colors ensure manufacturers can accurately replicate the exact hue in enamels, printing, or plating processes. Not every digital color translates equally well to paint, especially with metallic bases. Learn more about the science behind PMS and why color precision guarantees brand success in Pantone Matching System (PMS) in Metal Craft.
Line Weights, Minimum Gaps, and Clarity
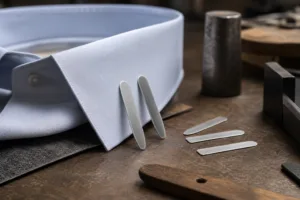
If your linework is too fine or gaps too tight, details may disappear after etching, stamping, or casting. As a rule of thumb, keep lines at least 0.2mm thick for etched or plated designs and all gaps slightly wider than the manufacturing method’s minimum tolerance. For die-casting or CNC detailing, ask the factory for their standard tolerances. This step is crucial for Understanding Tolerance in Metal Manufacturing and ensuring your logo or text remains readable at finished scale.
Working with Layers for Efficient Production
Well-organized layers aren’t just a designer’s luxury—they’re a production necessity. Use separate layers for outlines, color fills, text, and technical notes. This structure allows the engineering team to isolate each feature, making toolpath planning, plating setup, and quality control much easier. Don’t forget to label each layer clearly—”cutting outline,” “enamel fill,” or “engraving text”—to prevent costly confusion downstream. Strategic layering also speeds up revisions if changes are needed mid-process.
Outlining Fonts and Preparing Text
Text that isn’t outlined may be substituted if your factory doesn’t have the font installed, breaking your branding consistency. Always convert text to outlines (also known as “create outlines” or “expand”) before export. This locks your typography in place, eliminating font issues while ensuring engravings and raised lettering remain true to your design. If you need your manufacturer to adjust text later, supply both outlined and live-font versions as a courtesy.
Scaling Considerations: Can Your Detail Survive at Size?
Metal products, particularly pins or medals, are often shrunk down from their digital previews. Review your artwork at the final production size (100% scale) and even reduce it further on-screen (e.g., 25% or 10%) to check legibility of text, emblems, and intricate features. Watch out for details that disappear or blend together—refine or simplify at the vector stage to avoid disappointment in the final product.
Working With Custom Shapes, Outlines, and Bleeds
If your product features a unique shape or die-cut silhouette, add a separate outline layer for the cutting path. Indicate if the outline is for laser cutting, stamping, or CNC routing, and ensure the line is set with a high-contrast stroke color. For full-color printed metal parts (like nameplates or promotional coins), include a 1-2mm bleed to allow for slight shifts during cutting or plating. Manufacturing moves fast, but tiny misalignments can creep in—planning for this upfront preserves the integrity of your design.
Preparing for Multi-Part Assemblies and Movable Hardware
Designing products like medals with spinners, multi-layered pins, or dual-color closure caps? Separate each movable, assembled, or differently finished part into distinct layers or files. Indicate assembly order, finishes, and connection points clearly—organized vector artwork prevents costly production delays or assembly line confusion. For insight into the importance of tight tolerances and perfect fit, see How Tight Tolerances Create Luxury.
Critical Artboard and Canvas Size Settings
Set your artboard to match the final product’s physical size, using millimeters (mm) as the unit for accuracy. This ensures that all measurements, features, and font sizes translate directly to what arrives from the factory. Don’t leave excess blank space around the artboard—precision starts here. Include measurement lines and labels if relevant, but keep them separated in technical annotation layers (and never merged with graphics).
Using Reference Guides and Registration Marks
If alignment between print and metal is critical, or if multi-pass processes are used, registration marks and guides help the factory team position each step accurately. Place small, clear marks outside the cutting area, and identify their purpose in a notes layer. This is especially valuable for dual-finish items, intricate printing, or UV-special effects on modern UV printed metal products.
Checking Overlaps, Merges, and Compound Paths
Vector files are unforgiving to messy merges. Use the “pathfinder” or “combine” tool to ensure no overlapping or duplicate shapes remain. All enclosed areas (that will become holes or color fills on the final product) should be solid and combined. Ungroup any nested objects, and test by moving layers to quickly spot accidental overlaps. Clean artwork avoids unexpected gaps, weak spots, or double-cut lines when translated to a mold or engraver.
Applying Fill Colors: Solid, Gradients, and Effects
Metal manufacturing is built for solid fills and precise gradients, not fuzzy digital effects. Avoid drop shadows, transparencies, or mesh gradients that aren’t supported by the physical process. If you wish to have color transitions, ensure the manufacturer can achieve that effect—most will request simplified, hard-edged color steps in your vector file. Clearly define all colors in a key, using Pantone or RAL codes as industry standards.
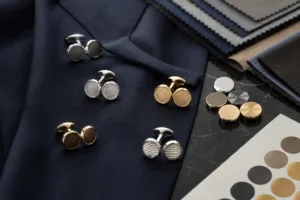
Defining Plating, Texture, and Finish in Artwork
Specific metal finishes—antique brass, mirror gold, matte black—can be indicated using labeled swatches or callouts in the vector file. Create a color key off to the side or in a separate annotation layer. Texture patterns (sandblasting, matte highlights, or frosted zones) should be marked with hatch fills or labeled areas. For advanced finishes, reference photos or prior samples can help clarify your intent to the manufacturer.

Technical Specifications: Essential Callouts and Legends
Include a clearly labeled area with all relevant technical specifications, such as dimensions, thickness, plating options, and color chart references. This “legend” acts as a master checklist, streamlining communication with engineering and QC teams throughout the factory. Place this near, but not over, the main artwork and keep it visible for all stakeholders.
Layer Naming Conventions and File Organization
Avoid cryptic layer names like “Layer 1” or “Group 42.” Use intuitive labels such as “Front Enamel Red (PMS 186C)” or “Cutline – Diecast.” If possible, group related layers (e.g., all plating features) and lock them when finished. Save your master file in native format (AI or CDR), and export production-ready versions as per your manufacturer’s request. Always use version numbers in file names to prevent mix-ups.
Understanding Tolerance and the “Safe Zone” for Features
Every manufacturing method has a limit on how tightly it can control detail. Ask your supplier for the minimum tolerance for the chosen process (e.g., die casting, chemical etching, stamping). Avoid placing critical features, like small cut-outs or text, right on the edge. Design with a “safe zone” buffer so no feature risks being lost to material variations or rounding during finishing. For best practices, consult the in-depth guide Understanding Tolerance in Metal Manufacturing.
Final Pre-Press Checklist Before Submission
- Remove any unused swatches or hidden objects
- Double-check all layer and color names
- Zoom in and out to spot hidden flaws
- Outline all fonts
- Make a backup copy before export
After completing this checklist, save a copy and send to your manufacturer with any required instructions or approval forms.
How Gairun Approaches Vector Artwork for Luxury Metal Products
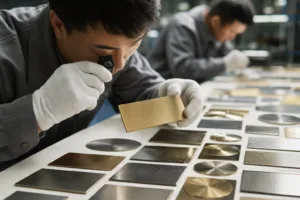
At Gairun, every vector file is reviewed for manufacturability and finish quality. We often work with our clients’ designers to refine artwork for clean mold lines, optimal plating coverage, and jewelry-grade finish. We prioritize clear layer separation, logical color referencing, and adherence to strict global standards for lead/nickel safety—especially on items like perfume caps or commemorative coins. Where necessary, we suggest micro-adjustments to avoid casting porosity or plating defects before any metal is poured, ensuring what you see really is what you get.
Common Mistakes: Pitfalls and How to Avoid Them
- Supplying raster (JPG, PNG) art as “vector files” (which causes blurry edges in metal parts)
- Linework that’s too fine or fonts below recommended size, leading to unreadable details
- Forgetting to outline fonts or merge overlapping objects, resulting in artwork misinterpretation
- Missing or unclear plating/finish notes—leading to color mismatch or surprise results
- Saving in the wrong file format (e.g., exporting as PDF with hidden raster layers)
A systematic vector file check will prevent these issues well before tooling or plating begins.
Practical Tips for Collaboration with Your Manufacturer
- Send both layered and “flattened” (but vector) versions if allowed
- Include a contact for design questions
- Clarify if the design requires matching to an existing metal finish or color
- Be open to technical feedback—it may enhance detail retention in finished products
- If your project involves award medals or bulk orders, check factory MOQ policy in advance; see Powerful Insights About Minimum Order Quantities (MOQ) for Metal Crafts
Case Study: Vector Artwork for a Die-Cast Commemorative Medal
A client was preparing an intricate commemorative medal with 3D relief and enamel accents. The original artwork included wispy lines and soft color gradients with several overlapping elements. We worked together to thicken lines, define hard-edged color fills, and group raised-relief features on isolated layers. This preserved the artistry while ensuring the transition to the die-cast mold kept every detail sharp—and ultimately, the medals were delivered with zero rejected units due to artwork errors.
How to Prepare Vector Artwork for Production

To recap, preparing your vector artwork for production means more than saving the file as “.ai” or “.svg”—it’s a disciplined process. Begin by verifying all measurements, color choices, and outlining text. Organize artwork in clear, functional layers with accurate technical notes. Always check line thickness against the manufacturing process’s minimums. Involve your manufacturer for feedback and be willing to adjust for feasibility or detail retention. Attention to these steps is what separates good finished metal products from great ones.
Ensuring Flawless Final Results: The Value of Diligent Art Preparation
A well-prepared vector file shortens your lead time, reduces costly communication errors, and maximizes the visual impact of your finished metal product. Whether preparing packaging hardware, branded medals, or premium promotional accessories—solid, thoughtful vector artwork is your first line of quality control and a true investment in the end result.
Frequently Asked Questions
What is the best file format for vector artwork in metal product manufacturing?
AI (Adobe Illustrator) and SVG are widely accepted and keep all vector information intact. EPS files are also common. Always check with your manufacturer for their specific requirements.
How thick should lines be in my vector artwork for metal manufacturing?
As a rule, lines should be at least 0.2mm–0.3mm thick. Thinner lines may not etch or mold well and could be lost during finishing or plating.
Why should I outline fonts before submitting artwork?
Outlining fonts converts text to vector shapes, ensuring your chosen typography appears correctly even if the factory doesn’t have your font installed.
How do I choose the right colors for metal products?
Use Pantone (PMS) spot colors in your file. This guarantees precise enamel, paint, or print matching and streamlines communication with manufacturers.
How do I avoid losing detail when scaling down artwork for small metal items?
Review your vector at 100% and smaller print sizes, removing or simplifying tiny features as needed to keep everything clear and legible in the final product.
Can manufacturers adjust my vector artwork if errors are found?
Many manufacturers can adjust minor features for production, but supplying clean, well-organized vector files avoids delay, confusion, and unexpected changes.
Related Reading
- Why Pantone Matching System Guarantees Unmatched Color Consistency in Metal Products
- Precision Perfection: Tolerance Mastery for Flawless Metal Manufacturing
- CNC vs. Hand Carving: How Your Artwork Impacts Mold Quality and Detail
- 7 Ways Modern UV Printing Revolutionizes Metal Product Finishes
- Minimum Order Quantities For Metal Crafts: What Buyers Need To Know