
Decorative plating does not reliably hide zinc die-casting defects. It can make a ridge, pore, scratch, or preparation problem more visible, so compare the same part through casting, polishing, cleaning, and plating before deciding where the defect began. For a record-ready approach to reporting finished-surface issues, see Common Plating Defects on Medals, Coins and Pins—and What Buyers Should Record.
Start by separating raised conditions, such as flash and burrs, from openings or depressions, such as pits and pores. A blister or lifted area is a plating symptom, but its cause may involve the substrate, preparation, or plating process. Location and timing help narrow the investigation; neither proves root cause on its own.
How to Identify Whether a Plating Defect Started in the Casting
Inspect samples at four useful checkpoints: as-cast, after polishing, after cleaning, and after plating. Mark the same face, edge, recess, or attachment area on each sample. If a feature is already present before polishing, the investigation begins with the casting or trimming stage. If it first appears later, focus on the changes made between those stages.
Classify what you see before assigning a cause. A raised line near a parting line suggests a different investigation from an open pore on a broad face. A blister is a lifted or separated plated area; discoloration and adhesion concerns also require attention to the coating and preparation stages. Polishing can expose an underlying opening that was not obvious on the cast surface.
Record the defect’s location, approximate size, distribution, finish, affected quantity, and when it was first observed. Include lot or cavity information if available. Note whether similar parts show the same condition. This record lets a supplier compare evidence across stages rather than relying on a description such as “bad plating.”
Visual inspection narrows the possibilities, but it cannot independently establish root cause. Retained samples and process records may clarify when the condition appeared. If surface appearance cannot distinguish a near-surface void from a coating failure, microscopy, cross-sectioning, or other suitable testing may be needed. An industry reference from Eazall on common zinc die-casting defect categories can help frame the casting-side investigation.
For custom zinc-alloy pins, badges, and medals, Gairun describes a workflow that includes die-casting, polishing, cleaning, plating, quality control, and packing. Buyers can ask which stage was checked and what evidence applies to the order. Gairun also states that incoming zinc-alloy materials are checked before production; request the relevant records and acceptance limits rather than assuming universal traceability or criteria. The forming method, relief, thickness, exposed metal, and decoration plan should be considered together before tooling. See How Zinc Alloy Die-Casting Works for Custom Medals, Coins and Accessories.
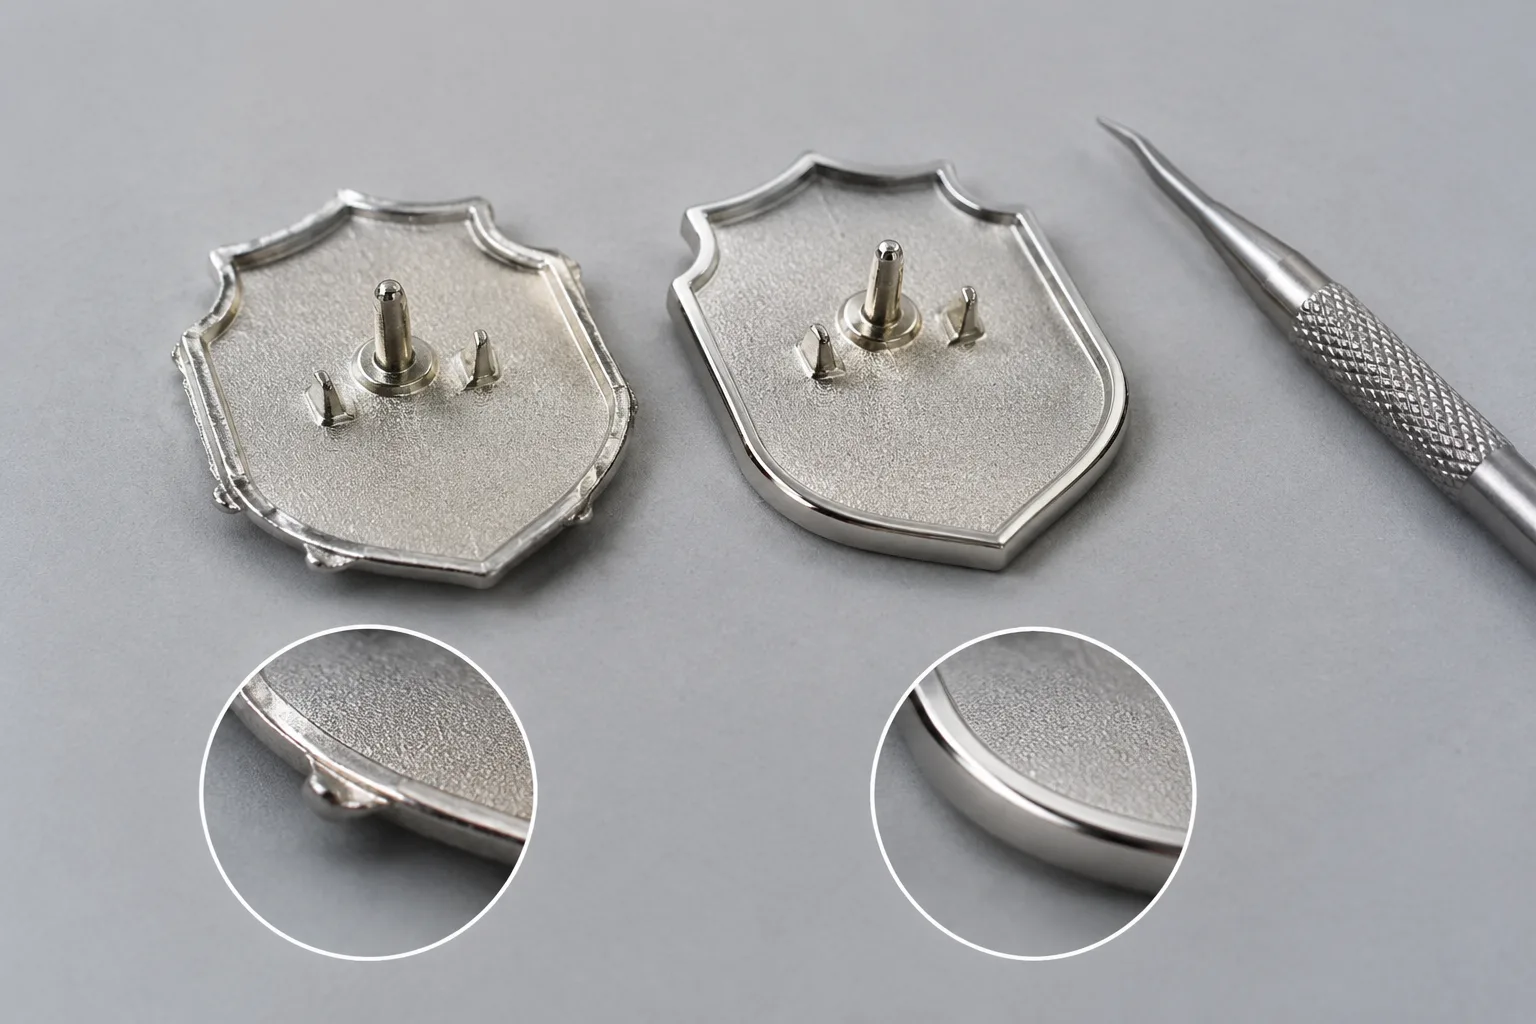
Flash, Burrs, and Parting-Line Defects After Decorative Plating
Flash is excess metal associated with the die parting line. Burrs are unwanted raised or sharp metal at edges, openings, trimmed areas, or attachment points. These conditions can affect appearance and safe handling. Their location matters: an edge burr on the back of a badge presents a different cosmetic concern from a mismatch crossing a visible border.
Polishing may reduce excess metal without fully removing its shape. A remaining ridge can read as an uneven border or shadow after plating. Raised details may also be intentional, so compare the part with the approved artwork or drawing before treating every ridge as a defect. This distinction is especially important around logos, lettering, relief transitions, and recessed details.
Inspect thin outlines, irregular bodies, holes, rear attachments, and parting lines that cross visible faces. Before plating, check burr removal, edge condition, border continuity, attachment areas, and flatness where the product requires it. A plated surface does not make a sharp burr acceptable. Define the allowable visible parting line, edge condition, and flatness in the drawing, approved sample, or inspection standard; there is no universal limit implied here.
Gairun states that burr inspection occurs after forming and flatness is checked after polishing. For die-cast pins and badges with formed outlines or dimensional relief, pre-tooling review may consider the borders, attachment position, relief, and proposed forming method. Small artwork features may not transfer unchanged, so describe which details must remain visible and where a parting line is unacceptable. Compare the forming route with Die-Cast vs Die-Struck Medals: Which Process Fits Your Artwork?.
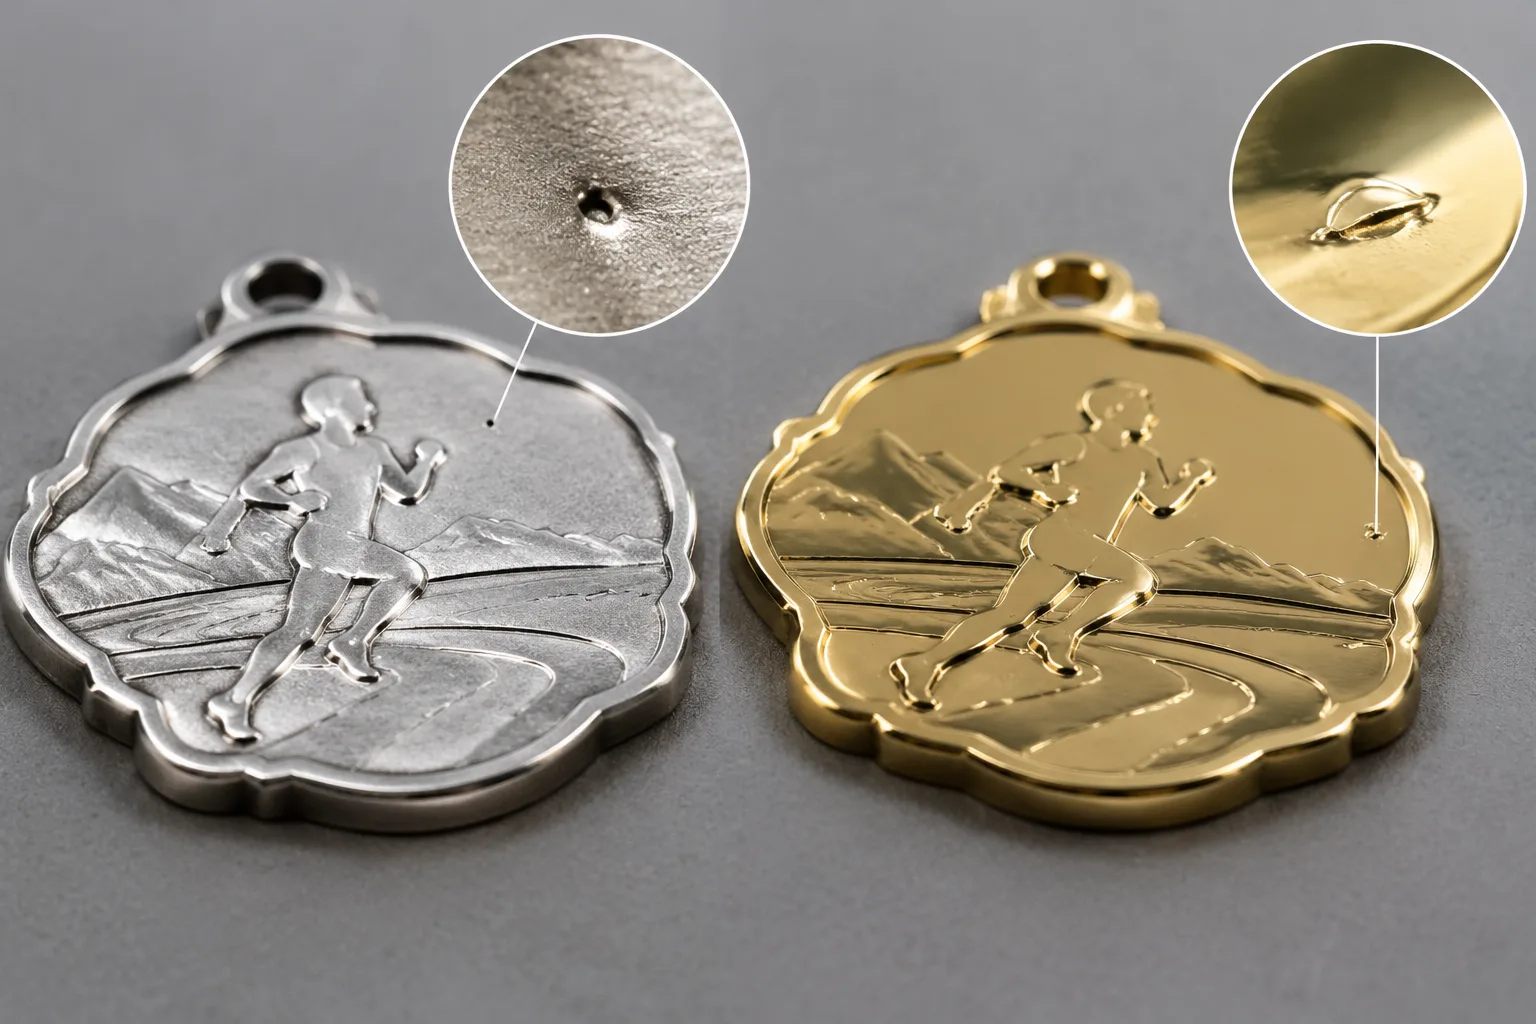
Surface Porosity, Pinholes, and Blistering Under Zinc Plating
Pores, pits, pinholes, and sink-like depressions are observable surface conditions, not one diagnosis. Gas-related voids and shrinkage-related conditions may also produce different patterns. Record the shape and distribution rather than choosing a corrective action from appearance alone. A small opening on a polished face and a broad rough area may need different investigation.
Polishing removes material, so it may uncover a pore that was covered by a thin surface layer. A blister appears as a plated area that has lifted or separated. Investigating it may require checking the substrate and the cleaning, activation, plating adhesion, and process compatibility. The timing is useful: compare the same area before and after plating, and note whether the blister is isolated or repeated across the part.
If the visual evidence cannot distinguish substrate porosity from a plating failure, ask whether microscopy, cross-sectioning, or another suitable test is warranted. A smooth plated face alone does not show that the casting is free from internal or near-surface porosity. Do not infer a coating thickness, adhesion grade, or corrosion performance from the finish name.
Gairun lists gold, silver, nickel, black nickel, antique bronze, and antique silver as plating directions. The selected tone and feasibility need to be coordinated with the artwork, base metal, relief, and exposed areas. Gairun states that plated parts are checked for color difference and adhesion; define the order’s finish standard, test method, and acceptance level separately.
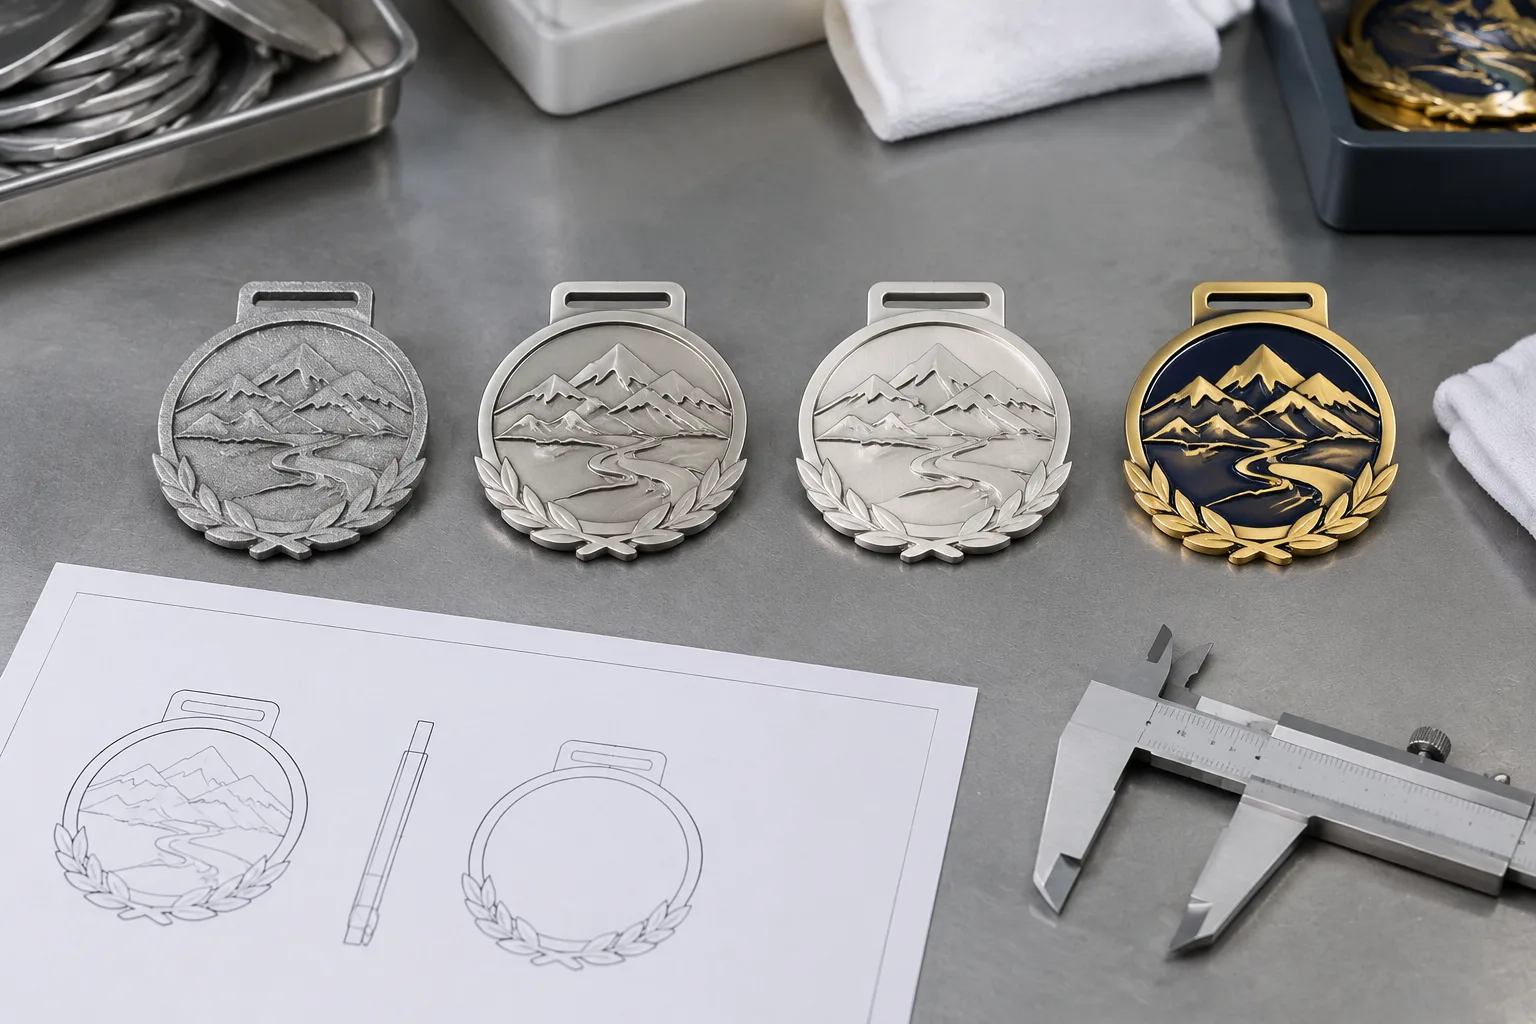
How Polishing and Cleaning Change the Final Plated Appearance
Polishing changes geometry by removing material; cleaning prepares the surface before decoration. Keep those investigations distinct. Polishing can flatten relief, widen a narrow border, open a pore, or leave directional marks and scratches. Residual media or contamination may instead affect the surface presented for plating. A later color or adhesion symptom does not by itself show which stage introduced the problem.
High points, narrow borders, recessed details, and broad faces do not respond identically to polishing. Compare consistent reference areas at each stage, looking for changes in relief, gloss, scratches, exposed pores, and border width. Before plating, confirm that burrs are removed, required flatness is acceptable, the surface is clean, relief remains legible, and the appearance matches an agreed reference.
Gairun describes a preparation flow that includes burr inspection, polishing, flatness checks, and cleaning before decoration, with automatic polishing and ultrasonic cleaning listed as supporting equipment. Gairun does not state a universal roughness, flatness tolerance, or cosmetic grade. Put those requirements in the drawing, approved sample, or inspection standard. Polishing and Surface Preparation provides more process context.
A custom sample, when selected, can be used to assess the proposed appearance and construction. Sample approval and authorization for bulk production are separate decisions. Specify which appearance details are being approved, especially where relief, gloss, or border width affects the plated result.
Pre-Plating Inspection Checklist and Defect Decision Table
Use the table to decide whether a part should proceed, be held, or receive further investigation. The initial decision is a screening action, not a universal defect limit. Apply the criteria in the order specification, drawing, or approved reference.
| Observable input and stage | Practical implication | Initial decision | What still requires confirmation |
|---|---|---|---|
| Flash or burr after forming | Raised metal may remain as an edge ridge after plating and can create a sharp handling point. | Hold for deburring if it conflicts with the approved edge condition. | Allowed edge condition, affected location, and whether the feature is intentional. |
| Parting-line mismatch on a visible face | A line or step may interrupt the border or relief. | Compare with the drawing and approved sample before polishing or plating. | Visible-face limits and required border continuity. |
| Open pore or pit after polishing | Material removal may have exposed a near-surface opening. | Hold the affected parts for disposition; do not assume plating will conceal it. | Extent, distribution, acceptable cosmetic boundary, and need for further examination. |
| Broad roughness before plating | May reflect casting condition or uneven preparation. | Compare cast and polished samples before choosing rework. | Approved surface appearance and whether relief can tolerate more polishing. |
| Scratch after polishing or cleaning | The mark may remain visible or affect the final appearance. | Locate and compare it with the agreed cosmetic reference. | Rework allowance and inspection lighting or viewing conditions, if specified. |
| Isolated blister after plating | Could involve substrate condition, preparation, or plating adhesion. | Hold and compare the same area on earlier-stage samples. | Cause evidence, disposition, and any required adhesion test. |
| Color difference or adhesion concern after plating | The result may not match the selected finish or order acceptance criteria. | Compare with the approved finish reference and applicable test method. | Color acceptance, test method, adhesion level, and whether independent testing is needed. |
At the relevant stages, also compare dimensions, thickness, relief detail, border continuity, attachment position, and flatness where the structure requires them. Gairun states that first-article inspection compares a formed part with an approved 1:1 drawing for dimensions, thickness, and relief detail after tooling and trial forming. Gairun also states that finished products receive a 100% visual inspection for surface scratches and that plated parts are checked for color difference and adhesion. Confirm which checks apply to your order and the acceptance criteria governing them.
Example 1: Uniform badge. Consider a zinc-alloy badge with an irregular die-cast outline and decorative plating. If edge burrs, a parting-line mismatch, or attachment-area distortion remains, the initial decision is to hold plating. Confirm the attachment, approved edge condition, dimensions, and surface standard. Scenario guidance for uniform badges lists a 25–45 mm maximum dimension and 1.5–2.5 mm body thickness. These are not universal specifications; artwork, wearing needs, and construction can change the choice.
Example 2: 5K or 10K running medal. Consider raised relief and a plated border. Compare relief transitions, border continuity, hanging structure, and polished surface before approving the plated sample. Confirm maximum dimension, body thickness, relief height, expected weight, finish, and hanging structure. Scenario guidance for this medal use lists 55–65 mm and 2.5–3 mm. Those values describe this scenario, not every medal, and do not set defect limits or prove suitability.
For either example, connect the artwork and construction details to the inspection reference before tooling and plating. Gairun’s pre-tooling engineering review may cover dimensions, thickness, relief, metal borders, color areas, attachments, component positions, and the proposed production method.
Corrective-Action Questions for a Zinc Plating Defect Report
Send enough information for the supplier to locate the issue and compare stages. Include the part number, finish, defect location and size, affected quantity, first-observed stage, and lot or cavity information when available. Attach clear photographs of the same area before and after polishing or plating, plus an annotated drawing identifying the face, edge, recess, border, or attachment area.
Ask whether retained as-cast, polished, cleaned, and plated samples or relevant process records can be compared. Request a proposed disposition: rework, stripping and replating, replacement, a tooling or process adjustment, or acceptance under a documented deviation. The appropriate option depends on defect classification and whether rework would change relief, dimensions, or appearance.
Before production continues, agree on the defect classification, evidence required, acceptance limit, corrective action, and approval point. State what must be checked again after correction: appearance, relief, dimensions, color, adhesion, and relevant attachments. No single visual symptom establishes root cause, and no universal defect-free, adhesion, plating-thickness, or corrosion claim should be inferred without defined evidence.
Gairun’s stated service path moves from requirement intake through artwork and engineering review, sample planning when selected, production coordination, packing, and shipment preparation. Buyers can ask which inspection stage and acceptance reference apply to the issue instead of requesting only a general quality statement. Gairun describes quality-control and packing areas in its factory workflow; exact records, any subcontracting arrangement, and the order’s inspection plan should be confirmed for the current project. See Quality Control and Product Testing.
Frequently Asked Questions
Can decorative plating hide zinc die-casting defects?
Do not rely on plating to hide a casting defect. It may make a ridge, pore, or surface variation more visible. Compare the part before and after preparation, then use the agreed cosmetic criteria to decide disposition.
How can I tell whether a blister started in the zinc casting or during plating?
A blister is a plated area that has lifted or separated, but appearance alone may not identify its origin. Compare the same location on as-cast, polished, cleaned, and plated samples. Process records or suitable testing may be needed to distinguish substrate condition from preparation or adhesion failure.
Should zinc die-cast parts be inspected before polishing and again before plating?
Yes, stage checks provide useful comparison points. Inspect the cast surface, then check burr removal and geometry after polishing, cleanliness before plating, and appearance and applicable finish criteria afterward.
What information should a buyer include when reporting flash, burrs, porosity, or plating defects?
Include part number, finish, defect location and size, affected quantity, when it first appeared, and lot or cavity details if available. Add stage-matched photos and an annotated drawing so the supplier can compare the same feature.
Does a plated sample prove that bulk production parts will be free from the same defect?
No. A sample helps assess the proposed appearance and construction, but it does not prove that every later part will be defect-free. Define the production inspection plan, acceptance criteria, and any required tests separately.